ASP.NET Core App with Multiple Sign-In Policies in Azure AD B2C

I’m currently finishing up an Extranet project that is using Azure AD B2C for signing in. Normally, that would be pretty trivial, but there were a few requirements that made it a little bit more tricky. We needed to mix both standard Azure AD B2C sign-in with Office 365 sign-in with different sign-in policies for these. This article is about how we eventually met these requirements.
Supporting Multiple Sign-in Methods
As I wrote, one of our requirements was to support both local sign-in (accounts stored in Azure AD B2C) and Office 365 sign-in. Normally, that would be pretty simple. Just add a generic OpenID Connect identity provider to the same sign-in policy with your local accounts. And configure that identity provider for Office 365.
However, there was one thing that made this a bit different. When signing in with local identities, we did not want to enable users to sign up. Instead, we are creating all Extranet user accounts in advance from a list of known e-mail addresses.
The Office 365 sign-in is intended for employees of the company hosting the Extranet. They are going to be signing in with their Office 365 accounts, and they should be able to sign up for the Extranet the first time they sign in. So, we needed two sign-in policies where sign-up is enabled only for the other policy.
Azure AD B2C Configuration
The picture below shows the list of user flows (a.k.a. policies) that we have set up.
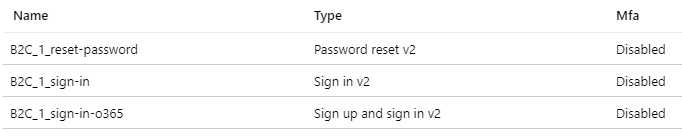
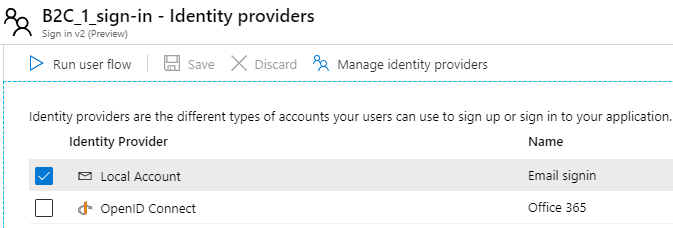
The “standard” sign-in policy is only a sign-in type, which does not enable signing up. This means that only user accounts already existing can be used for signing in. This policy enables only the Local Account identity provider, as you see from the picture below.
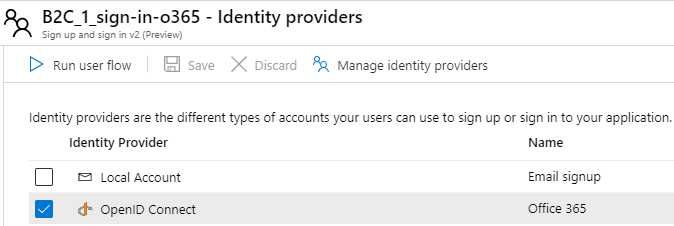
The other sign-in policy, with the -o365 suffix, supports both signing in and signing up. It’s important to remember, that even when you use an external identity provider, users need to be able to sign up with your Azure AD B2C tenant the first time they sign in. The Office 365 policy we have configured to use only the Office 365 identity provider, as shown below.
The trickiest thing so far is configuring a generic OpenID Connect identity provider for the Office 365 users. That’s pretty well documented here, so I’m not going to go that much into detail on how to do that. Of course there are other minor details in this setup, but this is more or less the big picture of our setup.
Application Configuration
The second part of the solution is to get the Extranet application properly configured. In our case, it is a Blazor Server application. However, the same setup applies to any ASP.NET Core web application, so we can just forget about the Blazor part for now.
Obviously, I cannot share the source code of this Extranet application, but I created a simple ASP.NET Core application on my GitHub account that uses the same approach. I’ll outline the most important things in this article. If you prefer, you can create a similar application with Visual Studio by following this article.
The appsettings.json file that is created looks like this.
{
  "AzureAdB2C": {
    "Instance": "https://<tenant name>.b2clogin.com/tfp/",
    "ClientId": "<client ID>",
    "CallbackPath": "/signin-oidc",
    "Domain": "<tenant name>.onmicrosoft.com",
    "SignUpSignInPolicyId": "<Sign-in policy ID>",
    "ResetPasswordPolicyId": "<Reset pwd policy ID>",
    "EditProfilePolicyId": ""
  }
}
In the Startup.cs class, the code that wires this configuration to the proper middle-ware looks like this:
services.AddAuthentication(AzureADB2CDefaults.AuthenticationScheme)
    .AddAzureADB2C(options => {
        this.Configuration.Bind("AzureAdB2C", options);
    });
The AddAzureADB2C method does not allow us to add more than one sign-in/sign-up policy, so we need to do it another way.
Every policy in Azure AD B2C has its own authorization endpoint, so what we actually do is that we add an additional OpenID Connect authentication scheme, and configure that to use the policy that we configured to use the Office 365 identity provider. So the code in the Startup.cs class will look like this.
services.AddAuthentication(AzureADB2CDefaults.AuthenticationScheme)
    .AddAzureADB2C(options => {
        this.Configuration.Bind("AzureAdB2C", options);
    })
    .AddOpenIdConnect("o365", options =>
    {
        AzureADB2COptions b2cOptions = new AzureADB2COptions();
        this.Configuration.Bind("AzureAdB2C", b2cOptions);

        var tenantName = b2cOptions.Domain.Substring(0, b2cOptions.Domain.IndexOf('.'));
        options.Authority = $"https://{tenantName}.b2clogin.com/tfp/{b2cOptions.Domain}/{b2cOptions.SignUpSignInPolicyId}-o365/v2.0";
        options.ClientId = b2cOptions.ClientId;
        options.CallbackPath = b2cOptions.CallbackPath + "-o365";
        options.TokenValidationParameters.NameClaimType = "name";
    });
So, in this code we add an additional authentication scheme o365 (line 5) that is hooked up to the default policy we use in the application, but with a -o365 suffix (line 13). Finally, we specify that the display name of the user is available in the name claim, and not the default http://schemas.xmlsoap.org/ws/2005/05/identity/claims/name.
To have your users then signing in with the default sign-in policy, you create a link that points to /AzureADB2C/Account/SignIn. For other authentication schemes, you append the name of the scheme to the URL, so to have your users sign-in with Office 365 credentials, you link them to /AzureADB2C/Account/SignIn/o365.
Finishing Up
You might not want to publish the Office 365 sign-in link on the Extranet as I’ve done in the sample application. That might just confuse your customer’s customers, the actual users of the Extranet. Instead, you can have your customer publish a “Sign in to the Extranet” link on their Intranet or similar. In that case you would naturally use the absolute URL to trigger the sign in, for instance https://extranet.yourcustomer.com/AzureADB2C/Account/SignIn/o365. Their customers will then use the normal sign-in link on the Extranet.
So, if you need to support multiple different ways of signing in to an application in Azure AD B2C, and want to configure things separately for different methods that can only be configured on a policy level, then this solution might be for you.
Also, if you enable multiple identity providers on one sign-in policy, then all those identity providers will be visible on the sign-in page provided by Azure AD B2C. This might not always be what you desire. In that case, the solution I’ve described here might also be an option for you.
Further Reading
A summary of links I’ve used in this article.


1 Comment
Jos Clijmans · March 14, 2021 at 18:44
I’m having problems with this solution. Maybe it’s because I use the AddMicrosoftIdentityWebApp as is now the standard for a newly generated asp.Net 5 application.
For the new scheme “directidp” i use following code in the startup.cs
var idOptions = new MicrosoftIdentityOptions();
this.Configuration.Bind(“AzureAdB2C”, idOptions);
var signupSigninPolicyId = $”{idOptions.SignUpSignInPolicyId}-directidp”;
var tenantName = idOptions.Domain.Substring(0, idOptions.Domain.IndexOf(‘.’));
options.Authority = @$”https://{tenantName}.b2clogin.com/tfp/{idOptions.Domain}/{signupSigninPolicyId }/v2.0″;
options.ClientId = idOptions.ClientId;
options.CallbackPath = idOptions.CallbackPath + “-directidp”;
options.TokenValidationParameters.NameClaimType = “name”;
options.SignInScheme = Microsoft.AspNetCore.Authentication.Cookies.CookieAuthenticationDefaults.AuthenticationScheme;
}
I needed to extra set the SignInScheme to Cookies to get it to work
In azure B2C i can see that the user is authenticated and received a token,
but my homepage does not see that the user is authenticated and sends me back to the login
Any hints would surely help.