Use Microsoft Foundry Models With GitHub Copilot in VS Code
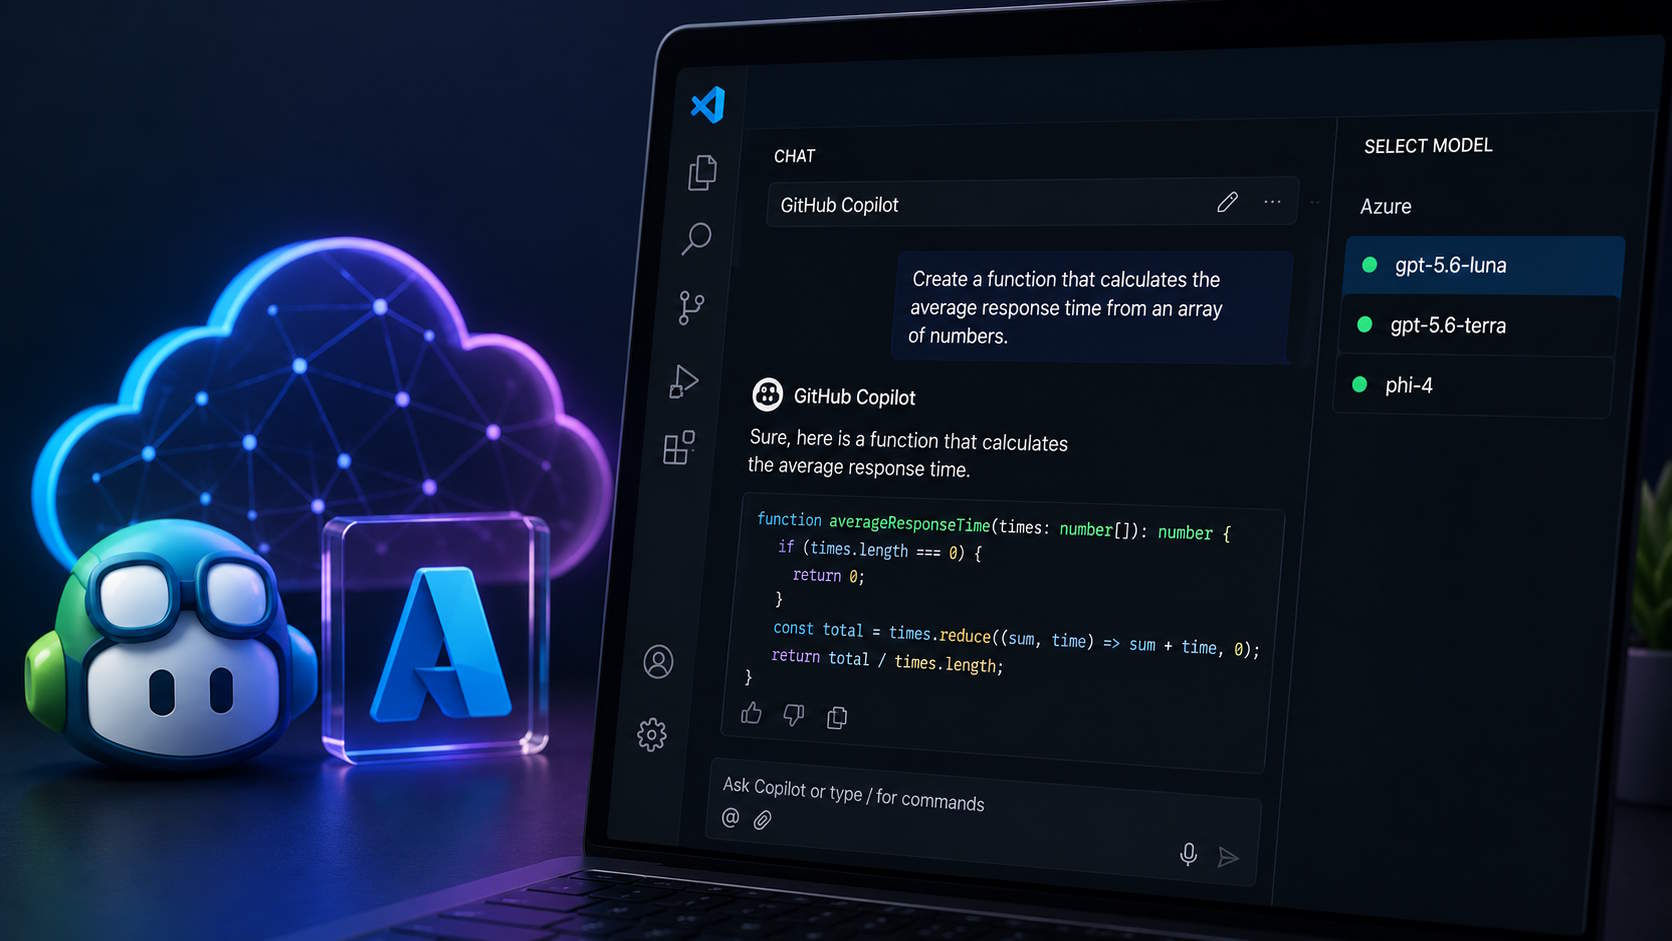
GitHub Copilot is a great way to add AI-assisted development to VS Code. But what if you don’t want to decide up front which Copilot subscription gives you the models, features and capacity you need?
By using your own models deployed in Microsoft Foundry, you can use a more pay-as-you-go approach, where your costs are based on the models and resources you actually consume. You can also choose from models available in Microsoft Foundry that might not be available through your GitHub Copilot plan. In this article, I’ll show you how to connect these models to VS Code and use them in the same chat and agent workflows you are already familiar with from GitHub Copilot.
Why Use Microsoft Foundry Models?
Many developers and architects use AI as a power tool rather than as an autonomous developer. You know what you want to build and how you want to build it, but use AI to explain unfamiliar code, generate or modify code, write tests, refactor something, troubleshoot a problem, or simply get things done faster.
If most of your AI usage happens by asking GitHub Copilot to do something from the VS Code Chat interface, models deployed in Microsoft Foundry can be a very interesting alternative.
I have been using GitHub Copilot actively for around a year now, and models deployed in Microsoft Foundry with GitHub Copilot in VS Code for several months. During that time, I have tried different AI tools and integrations for VS Code, but I keep coming back to GitHub Copilot. I simply like how naturally it integrates with VS Code and fits into my everyday development workflow.
Because I have been very pleased with how well Foundry models work with this setup, I thought it was worth sharing how I use them.
By connecting VS Code to multiple Microsoft Foundry resources, you can also separate your AI usage costs between different Azure subscriptions, customers, or internal cost centers. The model usage is then billed to the corresponding Azure resources instead of everything being tied to one GitHub Copilot subscription.
I am not suggesting that models deployed in Microsoft Foundry can replace everything you get with a GitHub Copilot subscription. There are still GitHub Copilot features that require a proper Copilot plan. VS Code’s BYOK support applies to Chat and utility tasks, while features such as standard inline code completions, semantic search, and other features that rely on embeddings still depend on GitHub Copilot.
Models I Use
At the time of writing, I mainly use two models from the GPT-5.6 family. GPT-5.6 Luna has become my default workhorse, while I typically switch to GPT-5.6 Terra for trickier problems. I have been very pleased with both, and Luna in particular has turned out to be a very capable, cost-effective, and fast model.
The pricing makes Luna especially interesting for the kind of everyday AI-assisted development I describe in this article.
To put that into perspective, here are my actual usage figures after roughly two weeks of daily use. According to the monitoring information in Microsoft Foundry, I have consumed more than 80 million input tokens and over 600,000 output tokens with GPT-5.6 Luna. Looking at Cost Analysis in the Azure portal, my actual total cost for that usage has been around €5.50.
These are not theoretical estimates or example calculations. They are the actual figures from my own Azure environment and my own daily usage.
That is a lot of AI usage for the price of a couple of cups of coffee.
Of course, your costs may be different. Pricing depends on factors such as the model, deployment type, region, how much context VS Code sends to the model, and your Azure pricing agreement. Still, my own numbers give a useful idea of why I find the pay-as-you-go approach so interesting for everyday development work.
Setting Up VS Code
Note! The examples in this article were tested with Visual Studio Code 1.133. The functionality described here was introduced in earlier versions of VS Code, but the user interface and available configuration options may differ between versions.
The setup described in this article uses the built-in language model support in VS Code, so you don’t need to install any extensions just to connect to your Foundry models. Azure and Microsoft Foundry is one of the model providers supported directly by VS Code.
Before configuring VS Code, you need at least one suitable language model deployed in Microsoft Foundry. In my case, I have a couple of different LLMs deployed so that I can switch between them depending on what I am working on.
I will not go through the model deployment process in this article. I assume that you already know how to deploy models in Microsoft Foundry. What we need from each deployment is the endpoint, deployment name, and authentication details.
For the setup in this article, I use an API key from my Foundry project. VS Code stores the key separately from the language model configuration, so you don’t have to add the actual key to the JSON configuration.
For improved security, you can also restrict network access to your Microsoft Foundry resource. Foundry supports selected networks and private endpoints. If you restrict access this way, the computer running VS Code must naturally be able to reach the Foundry endpoint, which may mean connecting through your corporate network or VPN.
Add a Foundry Model to VS Code
The first thing you need to do is open the VS Code Command Palette by pressing Ctrl + Shift + P. Start typing Chat: Manage Language Models, and select the Chat: Manage Language Models command from the list.

This opens the Language Models dialog shown below. This is where you can see the models currently available in VS Code and add new models from supported providers.
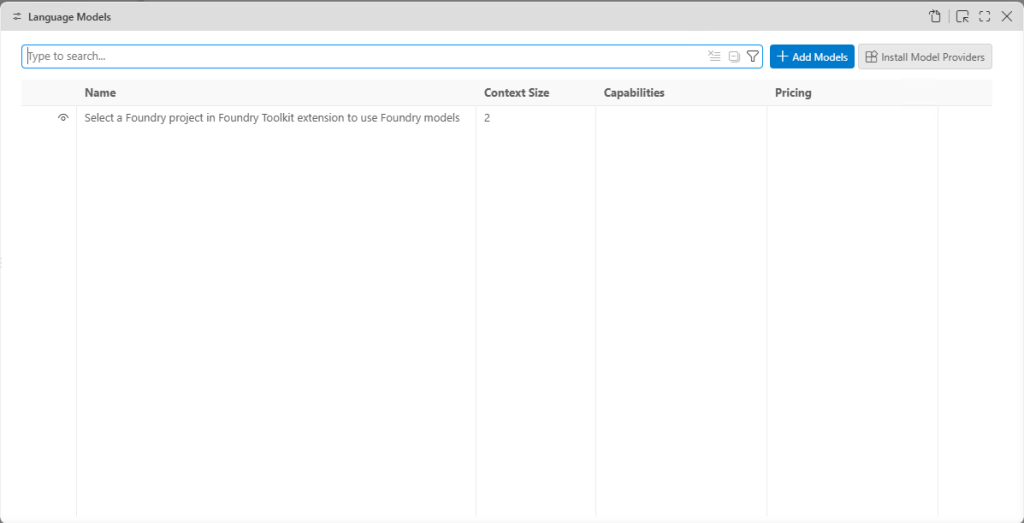
Click + Add Models, and select Azure from the list of available model providers.
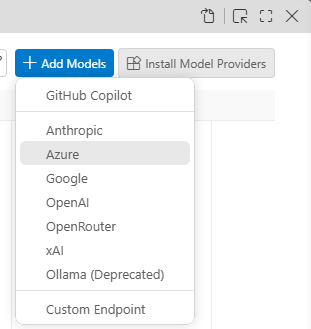
For every Microsoft Foundry resource you plan to use with GitHub Copilot in VS Code, you can define a separate group for its models. If you only plan to use one Foundry resource, you can simply leave the default group name as shown below.

After defining the group name, VS Code asks for the API key that it should use to authenticate with Microsoft Foundry.

You can find the API key on the Microsoft Foundry project home page. Copy the key from there and paste it into VS Code when prompted.
After you enter the key, VS Code opens the chatLanguageModels.json configuration where you can finish configuring your models. The API key itself is stored separately and referenced from this configuration rather than being written directly into the JSON.
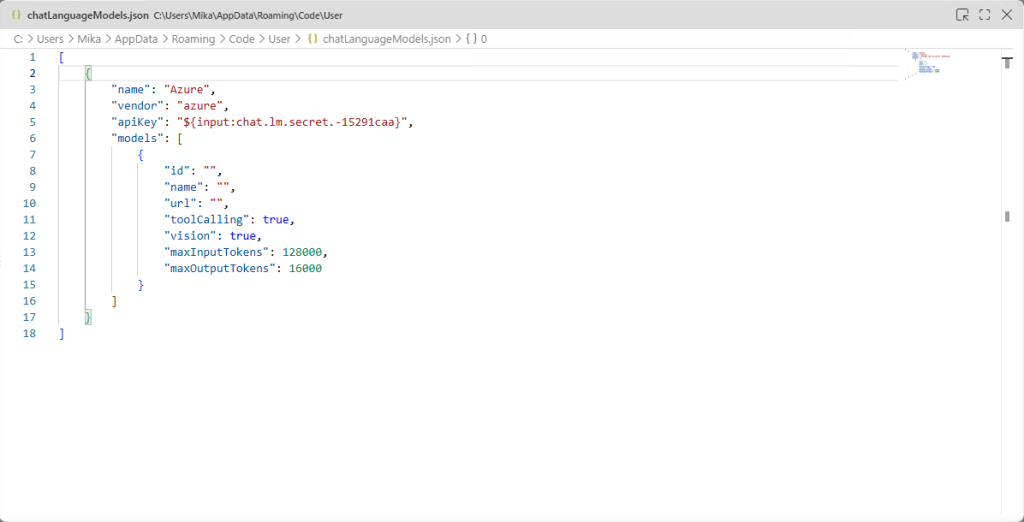
The configuration allows you to define one or more LLMs for the Foundry resource you are connecting to. If some of the attributes below are not included in the empty template, you can simply add them yourself.
For each model, configure the following attributes:
id: The deployment name you used when you deployed the model to Microsoft Foundry.name: The name you want to see in the model drop-down in the VS Code Chat view.url: The endpoint that VS Code uses to communicate with the model. I will show you below how to get the correct URL.toolCalling: Set this totrueif the model supports tool calling. Tool calling is required if you want to use the model with agents in Chat.vision: Set this totrueif the model supports image input.thinking: Set this totrueif the model supports reasoning.maxInputTokens: The maximum number of input tokens available to the model.maxOutputTokens: The maximum number of output tokens the model can generate.editTools: Specifies which code editing tools VS Code can use with the model. I explicitly enableapply-patch,code-rewrite,multi-find-replace, andfind-replace. The value for this attribute is a JSON array of strings.
The sum of maxInputTokens and maxOutputTokens must not exceed the context window supported by the model. The values therefore need to match the capabilities of the model you are configuring. The editTools property is optional. If you leave it out, VS Code can try the available editing tools and choose one automatically.
Getting the Correct Model URL
The url property is easy to get once you know where to look. Open the model deployment in Microsoft Foundry and go to the Details tab. There you will find the Endpoint URL for the model.
For instance, the endpoint for my GPT-5.6 Luna deployment looks like this:
https://<foundry-instance-name>.services.ai.azure.com/openai/v1/responses
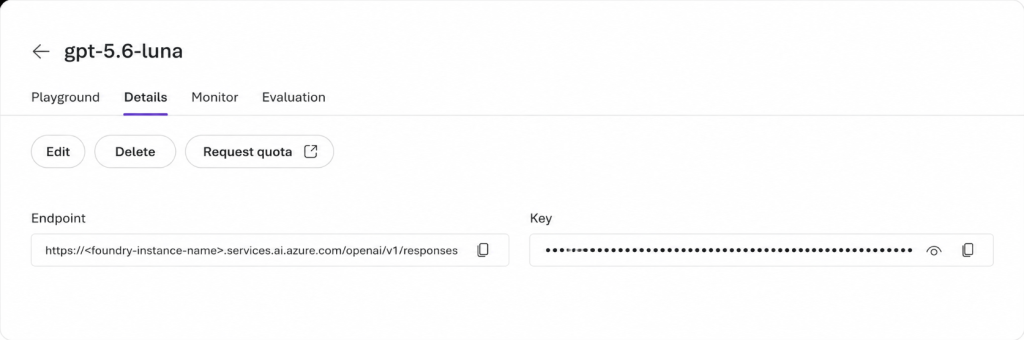
Copy that URL and use it as the value of the url property in your VS Code model configuration.
Complete Configuration Example
With the model details filled in, the configuration looks something like this:
[
  {
    "name": "Azure",
    "vendor": "azure",
    "apiKey": "${input:chat.lm.secret.-15291caa}",
    "models": [
      {
        "id": "gpt-5.6-luna",
        "name": "gpt-5.6-luna",
        "url": "https://<foundry-instance-name>.services.ai.azure.com/openai/v1/responses",
        "toolCalling": true,
        "vision": true,
        "thinking": true,
        "maxInputTokens": 128000,
        "maxOutputTokens": 16000,
        "editTools": [
          "apply-patch",
          "code-rewrite",
          "multi-find-replace",
          "find-replace"
        ]
      }
    ]
  }
]
The apiKey value is a reference generated by VS Code. Your value will therefore be different from the one shown above.
The token limits in this example are also just configuration values for this particular model. Make sure you use values that match the model you have deployed.
If you have several models deployed in the same Microsoft Foundry resource, simply add more model objects to the models array.
When you are done, press Ctrl + S to save the configuration. Your Foundry model should now be available in the model picker in the VS Code Chat view.
Configure the Utility Models
VS Code uses separate utility models for some background AI tasks instead of the model you have selected in the Chat view. These tasks include generating titles, commit messages, branch names, and other lightweight operations.
To configure these models, open the Command Palette with Ctrl + Shift + P and run:
Preferences: Open User Settings

In the Settings dialog, search for utility model.
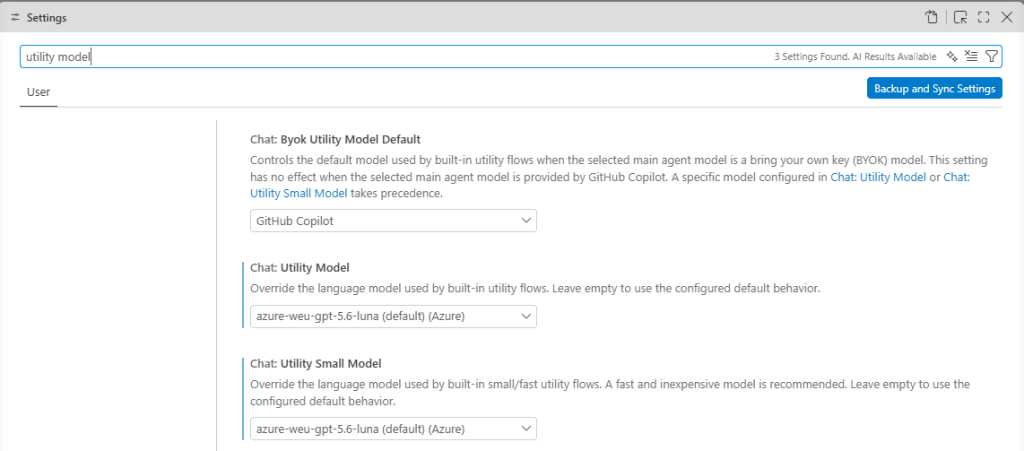
You should see the following two settings:
- Chat: Utility Model
- Chat: Utility Small Model
Select the Microsoft Foundry model you configured earlier for both settings.
For my setup, I use GPT-5.6 Luna for both. It is fast, capable, and well suited for smaller tasks such as generating commit messages.
The two settings actually serve slightly different purposes. Chat: Utility Model is used for general utility tasks such as summaries, settings search, and Git review. Chat: Utility Small Model handles faster and lighter tasks such as commit messages, branch names, rename suggestions, and intent detection.
Configure Default Models for Different Tasks
You can also configure which model VS Code should use by default for different AI tasks. For instance, you might want to use one model for planning and another for everyday utility tasks.
Open User Settings again and search for default model:
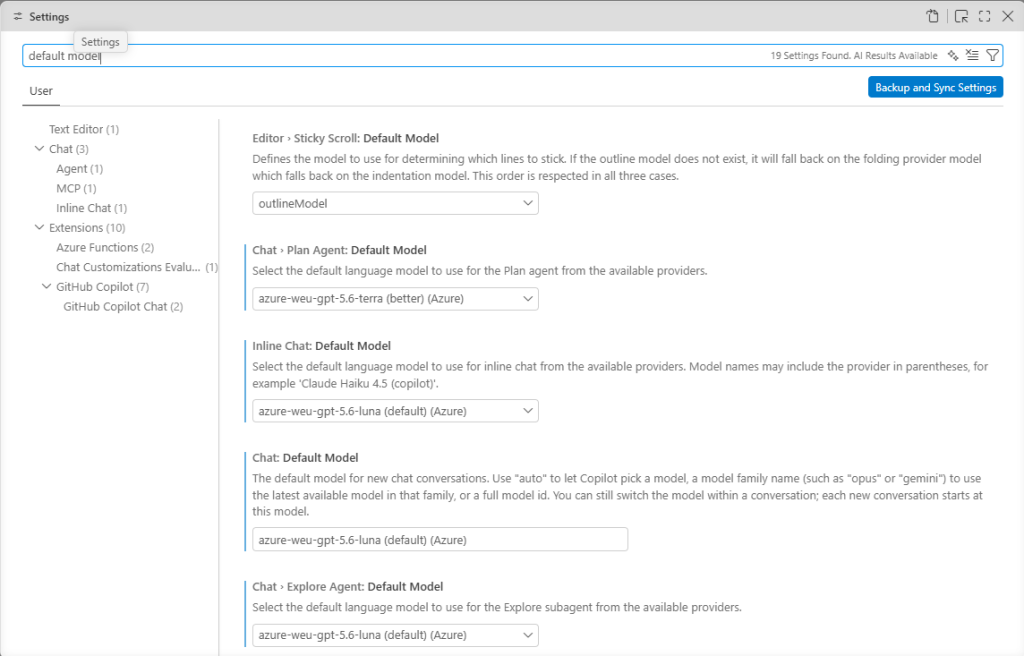
VS Code will show settings where you can select default models for different tasks and agents. For example, the Plan agent has its own default model setting.
For my setup, I can use GPT-5.6 Terra as the default model for planning while keeping GPT-5.6 Luna as the faster and more cost-effective model for everyday utility tasks.
This gives you quite a bit of flexibility. You don’t have to use the same model everywhere. You can use a fast and inexpensive model for routine work and reserve a more capable model for tasks where the additional reasoning is actually useful.
Common Questions
Do I Still Need a GitHub Copilot Plan?
Not necessarily.
VS Code supports BYOK models for Chat and utility tasks without signing in to GitHub and without a GitHub Copilot plan. However, BYOK does not replace every Copilot feature. Standard inline code completions, semantic search, and features that depend on embeddings still require GitHub Copilot.
If your main use case is interacting with AI through the VS Code Chat interface, your own Microsoft Foundry models can therefore cover a significant part of your everyday AI usage.
Can I Configure More Than One Microsoft Foundry Resource?
Yes. You can create separate Azure model groups in VS Code for different Microsoft Foundry resources.
This can be useful if you want to separate usage between different Azure subscriptions, customers, or internal cost centers.
Can I Configure Several Models From the Same Foundry Resource?
Yes. Simply add multiple model definitions to the models array for the same Azure group.
This is how I configure different models for different purposes. For instance, I use GPT-5.6 Luna for most everyday tasks and GPT-5.6 Terra when I need a bit more reasoning power.
Do I Have to Use the Same Model Everywhere in VS Code?
No. You can configure different models for different tasks.
You can select a model directly from the VS Code Chat model picker, configure separate utility models, and define default models for specific agents and tasks.
Summary
Using your own models from Microsoft Foundry with GitHub Copilot in VS Code gives you a lot of flexibility without changing the development environment you are already familiar with.
You can choose the models you want to use, pay for the model usage through Azure, configure different models for different tasks, and even separate usage between different Foundry resources and Azure subscriptions.
For me, this has turned out to be a very practical setup. I get to keep the GitHub Copilot experience in VS Code that I already like, while having much more control over which models I use and how that usage is billed.
If you mainly use AI as a power tool to help you work faster, rather than relying on autonomous cloud-based development features, using your own Microsoft Foundry models with GitHub Copilot in VS Code is definitely worth trying.


0 Comments