Using Azure Functions to Build a REST API with Custom Application Permissions
For a long time now, I’ve wanted to dig deeper into building REST APIs with Azure Functions. Especially focusing on leveraging Azure AD authentication with custom permissions for authorization. You can think of Microsoft Graph as the inspiration, and how it uses Azure AD and permissions to protect the resources you access through Microsoft Graph. In this article I’ll go through the steps you need to take to build such an API. Note that in this article, I’ll focus only on application permissions. Those are the permissions you grant another application, such as a background service or similar, to be able to call functionality exposed by your API. I’ll go through permissions for users in a future article.
Disclaimer! Some of the things described in this article could also be accomplished with Azure API Management. However, you still need to implement the API and define your Azure AD application registrations, for instance. Also, API Management may not always be a viable option for your particular needs.
The source code accompanying this article is available on GitHub in this repository.
Application Registrations
Since we are using Azure AD for authentication and authorization, we need to have each application registered with Azure AD. The list below outlines the applications I’m using in this article.
- Custom API – This application represents the Azure Functions application I’m using to build the REST API with.
- API Client #1 – The first client application that will be calling into the custom API.
- API Client #2 – The second client application that will be calling into the custom API.
The reason why I’m using two different client applications here is because that way I can demonstrate how you can grant different permissions to different clients. The clients will still connect to the same API. They will just be allowed to do different things, i.e. call different endpoints.
Note! Even though I have two separate client application registrations, there is only one client application in my sample code. This is because you can easily switch that client to act as either of the registered API client applications just by altering the
ClientIdandClientSecretconfiguration settings for the application.
To save some space, and focus on the key points, I’m not going to go through the basics of registering applications with Azure AD. Instead, I’m just referring to this documentation from Microsoft.
Custom API
This application represents the REST API that I’m implementing as an Azure Functions application. From an Azure AD perspective, I’ll just add two custom application permissions that I’ll use to protect the functionality of the API. The permissions that I use in this sample are:
Data.Read.All– The permission allows an application to read all data.Data.ReadWrite.All– The permission allows an application to both read and write all data.
The permissions very often have the following segments separated with a dot.
- Resource – The resource, entity or other object that the permission applies to.
- Action – The action that the permission allows the grantee to perform on the resource. These tend very often to be
Readfor read-only access andReadWritefor reading as well as creating, modifying and deleting. - Scope – A scope that can be used to specify a subset of the resources specified in the permission. This is usually
Allmeaning all resources, but you could narrow it down to better fit your purpose.
Please note that the permissions can be anything you want and find useful for your application. For instance, you could have
Page.ReadWrite.Published, to allow an application do anything with published pages. To prevent an application from emptying the recycle bin, you could usePage.Read.Deleted. Just to give you an example.
Adding Application Permissions
To expose application permissions in your application, you have to modify the manifest of the app. At the time of writing, mid July 2020, there is no UI for that on the Azure Portal.
So, open up the manifest of your API application, and add your application permissions to the appRoles array, as shown below.
"appRoles": [
		{
			"allowedMemberTypes": [
				"Application"
			],
			"description": "Allows the calling application to both read and write all data.",
			"displayName": "Read and Write Data",
			"id": "[guid]",
			"isEnabled": true,
			"lang": null,
			"origin": "Application",
			"value": "Data.ReadWrite.All"
		},
		{
			"allowedMemberTypes": [
				"Application"
			],
			"description": "Allows the calling application to read all data.",
			"displayName": "Read Data",
			"id": "[guid]",
			"isEnabled": true,
			"lang": null,
			"origin": "Application",
			"value": "Data.Read.All"
		}
	]
That’s all you have to do to the application registration in Azure AD.
API Client #1
We’ll configure the first client with only the read-only permission. To add that permission to the client application, you open the application configuration for the API Client #1.
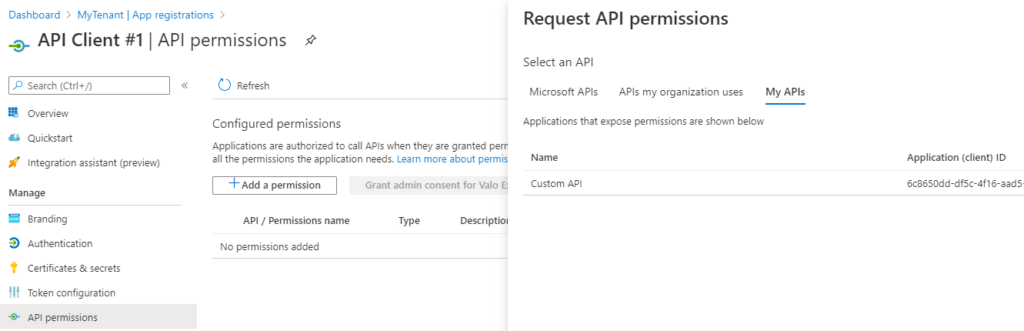
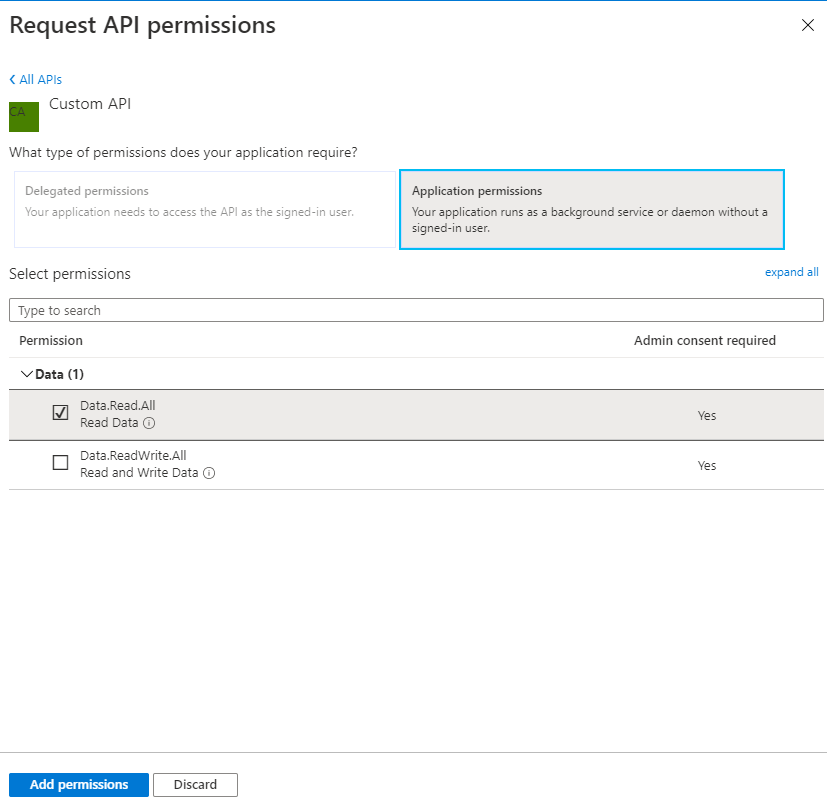
Then select API permissions under manage, click Add a permission and select Custom API under My APIs. Expand the list of permissions exposed by your API and select the permissions you want to grant to the application, and click Add permissions.
After you’ve selected the permissions you want to grant, you need to grant them with a separate action.
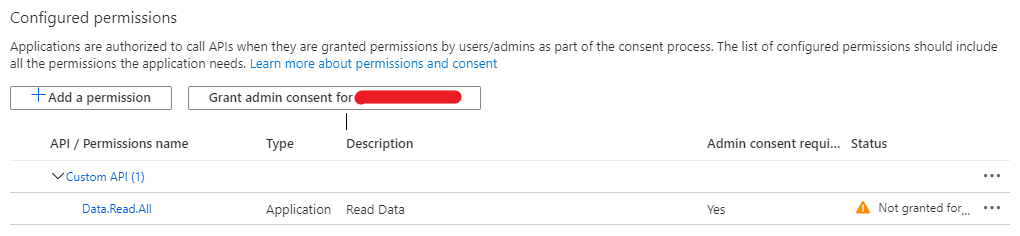
Note that you need to be a global admin to grant the permissions. Click the Grant admin consent for MyTenant button, and you are ready to go.
API Client #2
The second client application is just like the first one. The only difference in this sample is that I’ll grant more permissions to this application. This way, I can demonstrate how you can offer the same API to multiple clients and given them different permissions to your API.
Follow the same steps as with API Client #1 in the previous chapter, but in addition to granting Data.Read.All, I’ll add Data.ReadWrite.All too.
The Implementation
So, now that we have the configuration completed, it’s time to start with the implementation. All of the source code I’m adding in this article is available on GitHub in this repository.
The main applications in the source code use a few supporting assemblies. These are mainly related to configuration settings and custom input binding for the functions application. I’ll write more about custom bindings in future articles.
Also be sure to check out this article to learn more about building applications with Azure Functions. I also wrote another article about DI and configuration, which is more generic and covers console applications. You can apply the same principles to any kind of application.
Custom API
I’ll start with the API implementation. To keep it simple, it has only two HTTP triggered functions – One for each of the permissions we configured earlier. These functions are:
GET /readPOST /write
I admit, overly simplified, but still enough to demonstrate how you can apply this to your own functions. The implementation of these functions is irrelevant, and they only differ slightly in the method declarations.
The read method is declared as:
[FunctionName(nameof(Read))]
public async Task<HttpResponseMessage> Read (
    [HttpTrigger("GET", Route = "read")]HttpRequestMessage request,
    [PermissionGateway(Permissions.DataReadAll, Permissions.DataReadWriteAll)]PermissionGateway gateway,
    ClaimsPrincipal user
)
The difference to notice is the PermissionGateway parameter with its associated attribute on the Read function and Write function. That is how you specify which permissions are required to invoke the endpoint. Otherwise they are more or less standard HTTP triggered functions. There are a few points I’d like to highlight though.
Line 1 is the normal FunctionName attribute that all functions require. The value that represents the name of the function comes from the actual method name. This way I don’t have to use a constant string expression that has no connection to the actual name of the function. I’ve written about naming functions in a previous article, so be sure to check that out too.
The other thing I’d like to point out is line 4 and the PermissionGateway attribute. That is the attribute that triggers the custom input binding I created for the sample application. I’ll write more about custom bindings in future articles, but you can have a look at the source code already now. The main responsibility of this binding is to provide an object (PermissionGateway) that has resolved the permissions from the access token specified with the request. You use this object to execute your function implementation, but only if the caller has the necessary permissions. If the caller does not have permission, an unauthorized result is returned, and your code will not be executed.
Token Validation
Please note that the PermissionGateway input parameter does not validate the access token in any way. It assumes that you have configured your function application to use Azure AD authentication when you deploy it to Azure. When you run your application locally, there is no mechanism that takes care of authentication. But the PermissionGateway object will still process your access token and the permissions contained in it.
API Client
With the source code supporting this article, there is only one API client application. That’s because you can easily change the configuration for the application to act as either API Client #1 or API Client #2. In the real world, you would naturally have two different applications that would call different endpoints in the API.
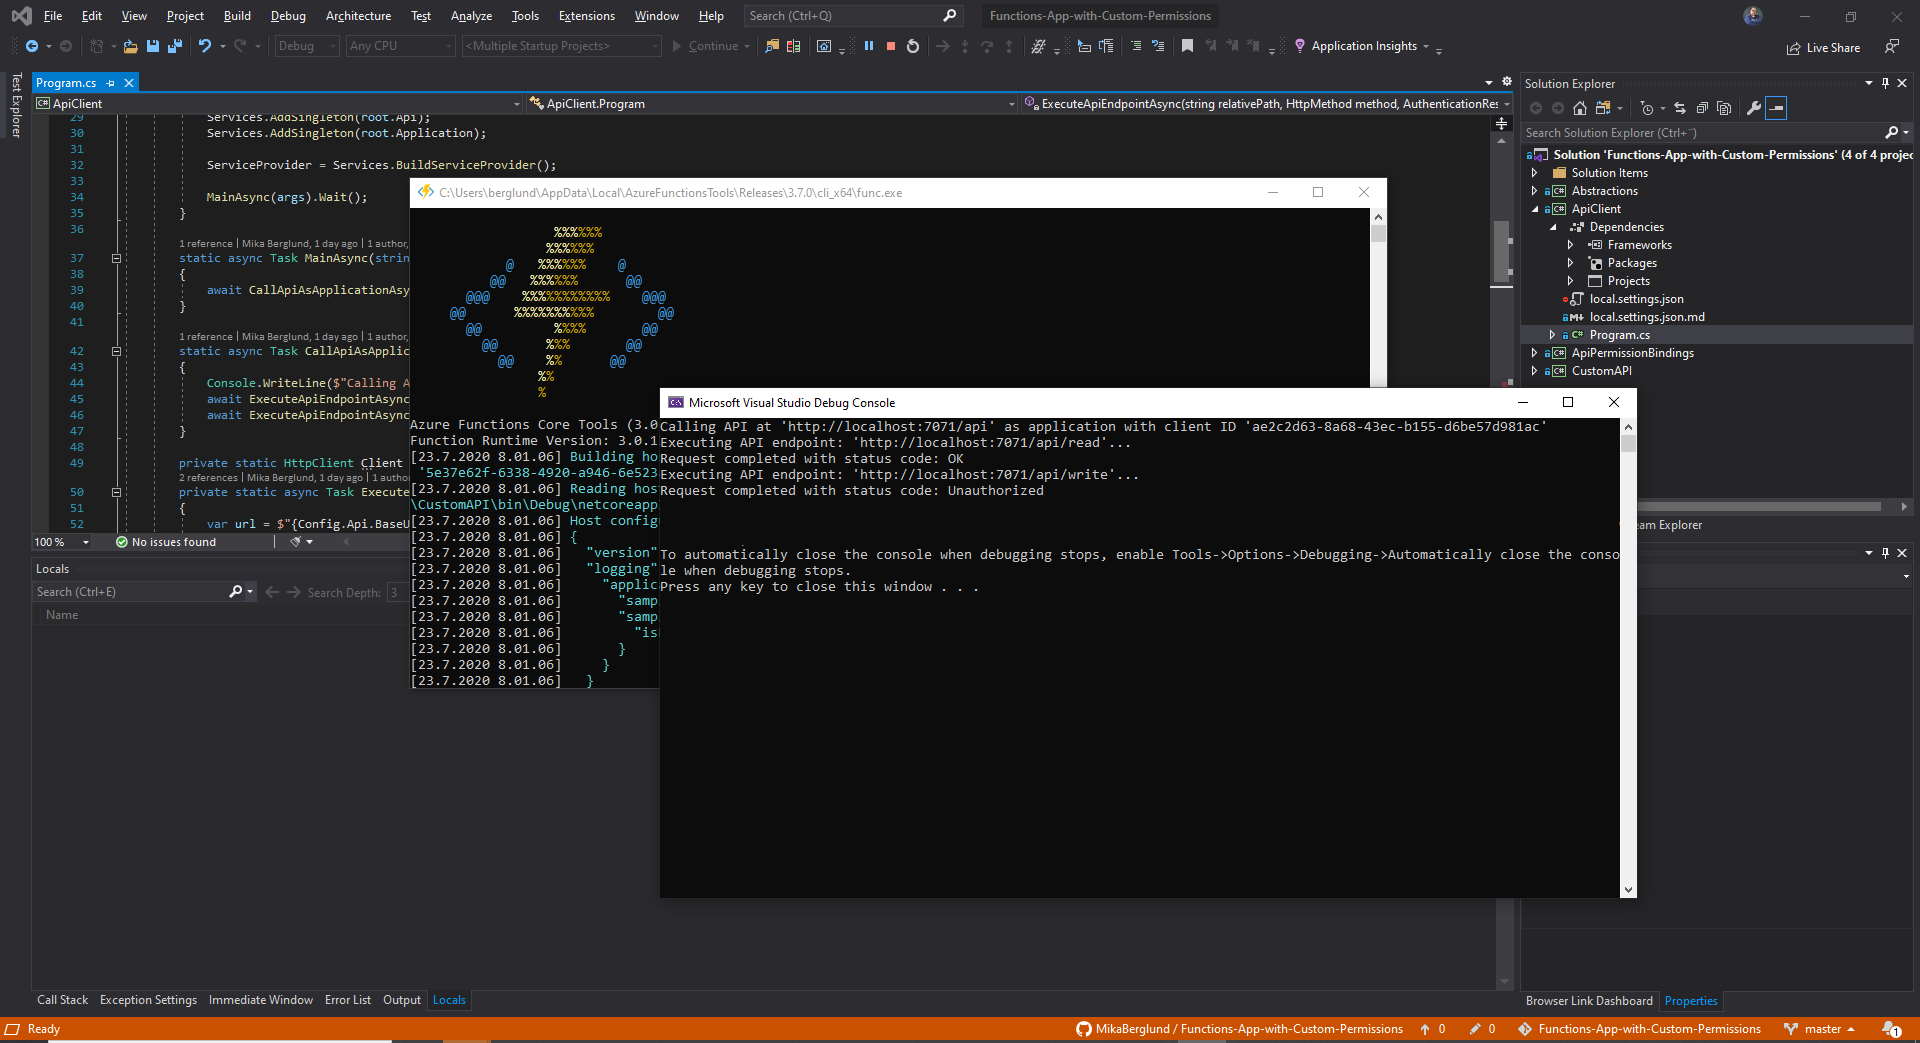
The Main method in that application is primarily responsible for loading in the settings from the local.settings.json file. The CallApiAsApplicationAsync method calls both of the endpoints in the API and outputs the results to the console. The calls are made as the configured application, which you can set to either API Client #1 or API Client #2. If you have configured your applications as I’ve done in this article, you would get an unauthorized status response when calling the /write endpoint as API Client #1.
To call the API, you first need to acquire an access token, and then add that token with every request to to the API as long as it is valid. In this sample application, the token is produced by the GetApplicationTokenAsync method. This method keeps a local copy of the token for as long as it is effective.
Calling an API with an access token is pretty easy using the HttpRequestMessage and HttpClient classes defined in the System.Net.Http namespace. This is all demonstrated in the ExecuteApiEndpointAsync method in my sample code.
Please note! You must not create a new instance of the
HttpClientclass whenever you need one. Instead, you should create one instance and reuse it throughout your application, or use anIHttpClientFactoryimplementation to create your HttpClient instances. The problem is described in detail in this article, so make sure you read it.
Conclusion
I hope this article has given you a better understanding of how you can write your own API applications with Azure Functions, and protect that API with Azure AD. You should also now have a better understanding of how to create a more fine-grained authorization mechanism with the help of applications permissions that you define on your API application.
This article is by no means a complete article on the subject. I will write more around building robust APIs with Azure Functions in future articles, so please come back. You can also subscribe to my RSS feed to get notified about new articles.
Let’s code!

0 Comments