Blazor Authentication with Blazorade MSAL – An Overview

Update January 19th, 2024 – Please note that the Blazorade MSAL library described in this blog post has been discontinued. The reason for this is that I wanted to make the library available to all kinds of applications that you build with Blazor, including MAUI applications. Turned out that the technical approach I took with Blazorade MSAL was a bit tricky in MAUI applications. So, I decided to rebuild the library from scratch keeping also MAUI applications in mind. That library is still in the early development phase. When I’m ready to publish the first alpha version, I will publish it under the name Blazorade ID. Until then, you are free to Blazorade MSAL as long as you remember that it will not support MAUI applications.
Authentication in a Blazor application is very similar to any web application. Especially if you are building a Blazor Server application, where authentication is identical to any ASP.NET Core application. But in Blazor WebAssembly applications you don’t have a back-end on your server. Everything lives on the client. This means that you for instance cannot have any secrets in your application.
Luckily there is a JavaScript version of the Microsoft Authentication Library that you can use with any web application. That is true also for Blazor applications, both server and WebAssembly.
I wanted to create a library for Blazor applications that you can use consistently in both Blazor Server and Blazor WebAssembly applications. This turned into yet another Blazorade library – Blazorade MSAL. This article shows you how you can use Blazorade MSAL to easily manage authentication in your Blazor applications. With this library, Blazor authentication just became a bit simpler.
If you want to read more about Blazor and Blazorade, check out my other articles on both Blazor and Blazorade. Also have a look at this article that describes a sample application for Blazorade MSAL that connects to Microsoft Graph with JWT access tokens.
Comparing to the WebAssembly Authentication Library for ASP.NET Core
I know that there is the Microsoft.AspNetCore.Components.WebAssembly.Authentication Nuget package from Microsoft. You can read more about how to use that library in your application in the docs. I’m not trying to compete with that in any way. that would be unwise. Instead, I just try to provide an alternative with a little different approach.
The main difference is that the WebAssembly Authentication library is more focused on protecting your routes and pages with authentication. You define the pages and routes that need authentication. Blazorade MSAL is more focused on protecting certain functionality.
What I mean by that is that with Blazorade MSAL, your Blazor authentication becomes more on-demand. You get an identity token or access token when you need it in your code. Blazor applications are Single-Page Applications (SPAs) that don’t act as traditional web pages – They don’t load the entire page. Instead, parts of the page are updated in response to user action. So with Blazorade MSAL, you can sync your token acquisitions with your user actions.
I’ll give you a simple example. You have an application that displays a user’s e-mail inbox. For that your application needs to have the Mail.Read permission. But, if the user decides that they also want to send out an e-mail, your application would need to request for the Mail.Send permission too. Your application could request that permission only when needed, and not when the page or component is loaded.
Creating a Sample Application
In the chapters below, I’ll go through all the necessary steps you need to take to build an application that handles Blazor authentication with Blazorade MSAL. The sample shows how you get the tokens that you can use to access for instance Microsoft Graph on behalf of your user. It also shows you how you can get an access token with additional permissions in response to user action. This keeps the sample code as simple as possible, so that we can focus on the main thing. You can then easily apply that to your needs.
Create a New Blazor WebAssembly Application
Just to show you how easy it is to use Blazorade MSAL to handle authentication in your Blazor WebAssembly application, I’ll use a WebAssembly application in this sample. The way you would use Blazorade MSAL in a Blazor Server application is very similar, mostly identical to what it is in a Blazor WebAssembly application. The only difference actually is where you store your application settings, and how you load those settings in during your application startup. I will highlight those differences below when there are differences.
So, create a Blazor WebAssembly application with .NET 5 as shown below.
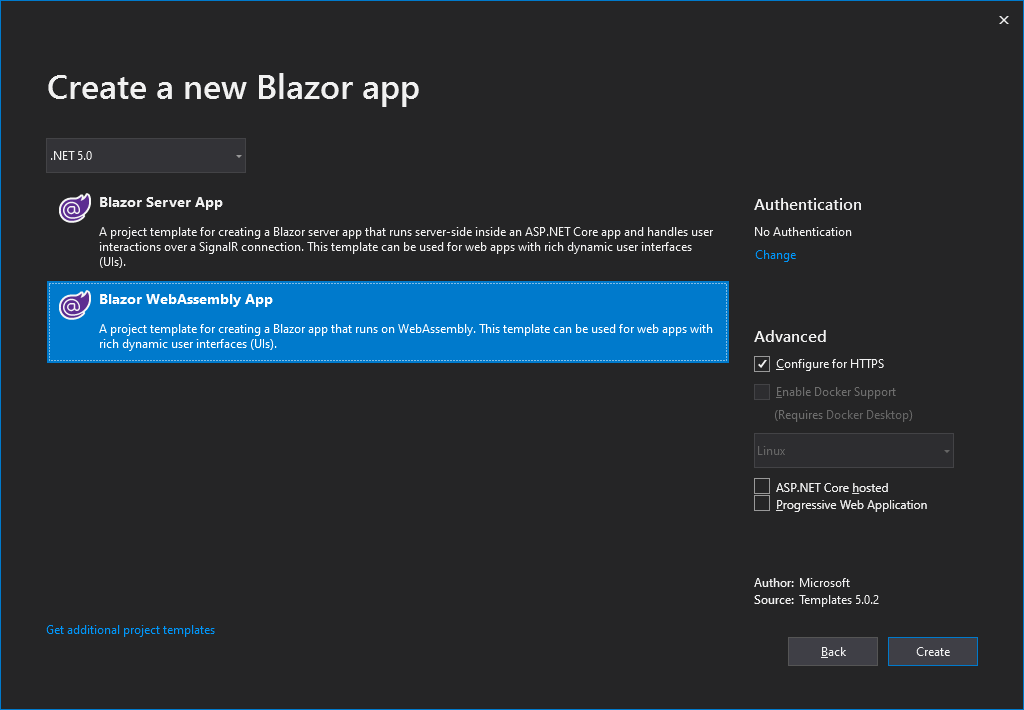
Make sure that the Configure for HTTPS is selected. Even though not explicitly required by Azure AD, it is a good habit to run your applications on HTTPS. Don’t select the ASP.NET Core hosted or Progressive Web Application checkboxes. Blazorade MSAL will work in those cases too, but in this sample, I’ll stick to as simple as possible.
When the application is created, run it by pressing F5, and take note of the URL it loads on. It will be different for you, but for me it is https://localhost:44377/. You will need this when registering your application with Azure AD.
Naturally, when you deploy your application to a server, either Azure, or some other hosting provider, the URL will be different. We’ll go with the localhost URL in this sample.
Add Reference to Blazorade MSAL
Blazorade MSAL is open source, so in theory, you could add the Blazorade MSAL repository as a submodule to your Git repository, and use it as source code in your application. A much easier way is to add a reference directly from Nuget.
When you have it referenced, locate the _Imports.razor file in your application, and add the following lines to it.
@using Blazorade.Msal.Components
@using Blazorade.Msal.Security
@using Blazorade.Msal.Services
Create a Login Page
A login page is only needed if you intend to use redirect login mode in your application. With Microsoft Authentication Library, you can basically handle user interaction in two different ways. Either your users will be redirected to Azure AD (or any other login provider) for logging in, and then redirected back to your application. Or, you can configure your application to show a popup window that will handle the user interaction.
Personally, I like the popup mode better, because that will ensure that the user’s context is not lost in case they must log in. You just pop up a login window, and when everything is complete, the login window will close and your application will get the access token.
However, with some browsers and in some circumstances, popups may cause problems, so you might want to consider the redirect mode too.
Well, anyway, if you intend to use the redirect interaction mode, you need to create a login page. This page will handle the response sent to your application with all the necessary codes that MSAL uses to acquire the tokens your application needs.
So, locate the Pages folder in your application, and add a new Razor component to the folder. Let’s call it Login.razor. Then clear out all code in the file, and add the following code to it.
@page "/login"
@inject NavigationManager NavMan

<LoginRedirectHandler OnLoginSucceeded='() => this.NavMan.NavigateTo("/")'>
    <p>Processing login. Please hang in there...</p>
</LoginRedirectHandler>
That’s all! The contents of the LoginRedirectHandler component can be anything you want to show on the login page. Of course, you could modify the login page in many ways, but this gets the job done. For instance, you might want to handle errors on the login page too. You can do that by adding an event handler on the LoginRedirectHandler component’s OnLoginFailed event.
Register Your Azure AD Application
To have Azure AD issue access tokens to your application, Azure AD needs to have a record of your application. You do this by registering your application with Azure AD.
Log in to the Azure AD management portal for your tenant you want to publish the application in. Then, navigate to the app registrations blade. Add a new application by clicking the New registration button. Then, type in the following information on the application.
- Name: Whatever you want to call your application. This will also be shown to your users when they log in and grant the permissions your application is requesting.
- Supported account types: Here you can select any type of account you want. I’ll just go with the default single-tenant application.
- Redirect URI: In the dropdown, select Single-page application (SPA), and type in the URI of your login page. For me, it would be
https://localhost:44377/login. Your application will most likely have a different port number. If you chose something else as route for your login page, you need to change the redirect URI accordingly.
Click Register to create the application.
Configure Application Settings
Locate the wwwroot folder in your application, and add an appsettings.json file to that folder. This file will contain all the necessary configuration for your application. Paste in the following into that file.
{
  "myapp": {
    "clientId": "<Application (client) ID of your application>",
    "tenantId": "<your tenant>.onmicrosoft.com"
  }
}
The clientId attribute contains the application ID of your application. The tenantId can be either the full name of your tenant, the guid that represents your tenant, or a vanity domain that you have registered with your tenant.
Important! Since this is a Blazor WebAssembly application, everything that you publish to your hosting provider is downloaded to the clients in order for your application to run. This includes all of your application settings too. This means that you must not add any sensitive data into your settings file.
In a Blazor Server application, you have one settings file for each environment. By default, in the root folder of your application, you have a
appsettings.jsonand aappsettings.Development.jsonfile where you would store these settings.
Add Necessary Startup Code
Open the Program.cs file in the root of your application. Add the following using statement to the list of using statements at the top of the file.
using Blazorade.Msal.Configuration;
Then, in the Main method, just before the last line of code (await builder.Build().RunAsync();), add the following.
builder.Services.AddBlazoradeMsal((sp, options) =>
{
    var appSettings = sp.GetService<IConfiguration>().GetSection("myapp");
    options.ClientId = appSettings.GetValue<string>("clientId");
    options.TenantId = appSettings.GetValue<string>("tenantId");

    options.DefaultScopes = new string[] { "openid", "profile" };
    options.InteractiveLoginMode = InteractiveLoginMode.Redirect;
    options.RedirectUrl = "/login";
    options.TokenCacheScope = TokenCacheScope.Persistent;
});
DefaultScopes defines the set of scopes that your application will request when acquiring for tokens, if not explicitly requesting more. By default, Blazorade MSAL defines openid and profile as scopes. The line 7 in the code snippet above is not needed, unless you set your default scopes to something else. I just wanted to show you that you can define default scopes with Blazorade MSAL.
The RedirectUrl will point to your login page. If you are not going to use redirect login, then you can skip this. However, you can have it configured regardless of the interactive mode you select. It only applies to redirect mode.
With the TokenCacheScope you specify how tokens are cached. The default is Session, which does not cache tokens across browser sessions. You may also find that some browsers don’t share session level information across multiple browser tabs. Persistent will keep the tokens cached across browser sessions. So, when your users come back, they don’t have to log in again. MSAL will also take care of refreshing the tokens when they expire.
In a Blazor Server application, you would add the startup code to the
Startupclass and theConfigureServicesmethod. The code is the same. You just put it in a different place.
Request Access Tokens in the Application
OK, so now all setup is complete, and it’s time to start writing some code! We’ll create all of the sample in a separate component, which you then can put on any of your pages, like the front page Index.razor in the Pages folder.
Open the Shared folder, and add a new Razor component. Let’s call it MSALDemo.razor. Clear everything from the file, and paste in the following code.
@inject BlazoradeMsalService MsalService
@code{
private AuthenticationResult authResult;
private async Task AcquireTokenAsync(params string[] scopes)
{
authResult = await this.MsalService.AcquireTokenAsync(new TokenAcquisitionRequest
{
Scopes = scopes,
FallbackToDefaultLoginHint = true
});
this.StateHasChanged();
}
}
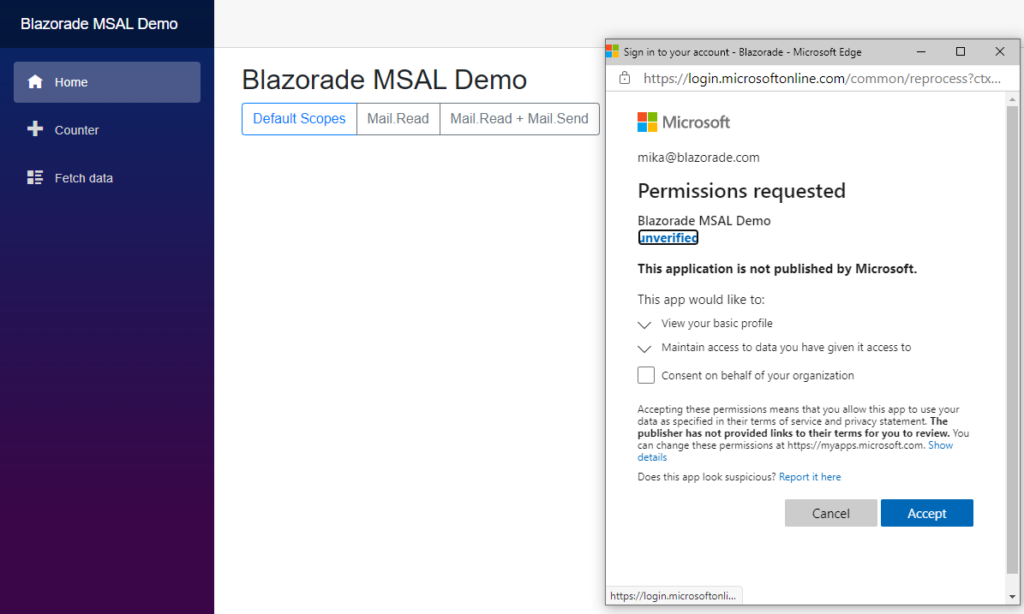
<h2>Blazorade MSAL Demo</h2>
<div class="btn-group">
<button type="button" class="btn btn-outline-primary" @onclick='async () => { await this.AcquireTokenAsync(); }'>Default Scopes</button>
<button type="button" class="btn btn-outline-secondary" @onclick='async () => { await this.AcquireTokenAsync("Mail.Read"); }'>Mail.Read</button>
<button type="button" class="btn btn-outline-secondary" @onclick='async () => { await this.AcquireTokenAsync("Mail.Read", "Mail.Send"); }'>Mail.Read, Mail.Send</button>
</div>
@if (null != this.authResult)
{
<h2>Result</h2>
<ul>
<li>Username: @this.authResult.Account?.UserName</li>
<li>Expires: @this.authResult.ExpiresOn</li>
<li>Scopes: @string.Join(", ", this.authResult.Scopes)</li>
<li><a href="https://jwt.ms/#access_token=@this.authResult.AccessToken" target="_blank">Access Token</a>: @this.authResult.AccessToken</li>
<li><a href="https://jwt.ms/#id_token=@this.authResult.IdToken" target="_blank">Id Token</a>: @this.authResult.IdToken</li>
</ul>
}
So, what you basically have here is three buttons. When you click on the first button that says Default Scopes, the code will use Blazorade MSAL to acquire a token that grants access to the scopes you defined as your default scopes in your Program class. When you click on the other two buttons, the code will again acquire a token with scopes defined in the button click event hander.
After you’ve added this component to your Index.razor file. You can run it to try out Blazor authentication with Blazorade MSAL. I removed everything else from that page except the MSALDemo component, so the code looks like this.
@page "/"

<MSALDemo />
Now, when you run the application and click one of the buttons to acquire a token, a popup window will pop up and ask you to log in. If you haven’t consented to the scopes acquired, you will also be asked to consent. If you are logging on as a global administrator of your tenant, you can choose to consent on behalf of all users in your tenant.
Feel free to play around with the code and change the scopes acquired.
Conclusion
Hope this gives you a better picture of what you can do with Blazorade MSAL. If you find some problems with it, please feel free to file an issue, and we’ll have a look.

10 Comments
Ian · September 12, 2022 at 21:32
Hi Mika
Quick question on this. I have an ADB2C tenant created and I have a user flow specified to allow logins with Username/Password. I might be missing something here but I’m not sure if (or even how) I can specify that user flow with Blazorade?
Any advice? The wiki docs don’t seem to mention it and I’m not exactly up to speed with the intricacies of B2C (i’m more of an Identity Server guy)
Help appreciated
Mika Berglund · September 13, 2022 at 09:55
Hi Ian!
I could have sworn that I had AADB2C covered already. Seems that I have implemented it for this issue, but did not complete that with a pull request. I will start working on that right away to have it completed and included in the package.
Until then, you can just set the
authorityoption to point to your login policy using the following format:https://[tenant-name].b2clogin.com/[tenant-name].onmicrosoft.com/[policy-id]Ian · September 13, 2022 at 11:14
Hi Mika!
Thanks for replying! These things happen sometimes 🙂
I’ve already tried setting the authority as suggested but encounter another error:
“ClientConfigurationError: untrusted_authority: The provided authority is not a trusted authority. Please include this authority in the knownAuthorities config parameter”
There doesn’t appear to be any options, (as of yet), to define the authorities in the MSALConfig or to set a flag to ValidateAuthority either.
Just thought I’d pass this on, (I might be completely missing something else here), but I appreciate the work you’re putting into this.
Thanks!
Mika Berglund · September 13, 2022 at 11:19
Hi Ian!
There is now a new version (v2.2.0) of Blazorade MSAL available on Nuget. This version adds support for easy configuration of Azure AD B2C, as documented in the Getting Started section on the Wiki.
I have not come across that untrusted_authority error when working with Azure AD B2C. Could you file an issue with as much detail as possible, and I’ll see what I can do to fix it.
Ian · September 13, 2022 at 11:24
Sure Mika,
Sorry for the double post 🙂 I’ll raise an issue in GitHub now.
Thanks
Ian
Mika Berglund · September 13, 2022 at 11:57
Thanks for that Ian!
Ian · September 13, 2022 at 11:46
Update!
The latest Nuget package works a treat 🙂
Thanks Mika!
Mika Berglund · September 13, 2022 at 11:57
Great to hear!
Ian · September 13, 2022 at 11:23
Hi Mika!
Thanks for replying! These things happen 🙂
I have tried adding the authority but get another error:
“ClientConfigurationError: untrusted_authority: The provided authority is not a trusted authority. Please include this authority in the knownAuthorities config parameter”
There appears to be no option in the MSALConfigOptions to set either an array or authorities or a ValidateAuthority flag – I could be missing something though.
Thanks for your work on this, it’s much appreciated.
Mika Berglund · September 13, 2022 at 12:00
I have a filed issue that I was planning on implementing a while ago, which I guess is the same as you are looking for here.
Support for multiple application configuration options